Quick start
For setting up your development environment, refer to the ‘Development environment’ section in the repo README.md file.
Requirements
for all the system requirements, check the dedicated requirements page
Nvidia Jetson initialization
Please refer to our Jetson Orin setup guide.
—- Simulator quick start —-
This part guides the user on how to install the find-my-kitten repository, a simulator, ROS2, QGroundControl, and how to run our main nodes on the system.
These instructions are similar to what you will find in the simulator docs at: docs/IsaacSim/Installing.md
Setup initial auxiliary software
Install necessary Ubuntu drivers by running: sudo ubuntu-drivers install
For docker containers you also have to install Nvidia Container Toolkit by running the following commands:
(commands taken from Nvidia docs at: https://docs.nvidia.com/datacenter/cloud-native/container-toolkit/latest/install-guide.html)
sudo apt-get update && sudo apt-get install -y --no-install-recommends ca-certificates curl gnupg2
curl -fsSL https://nvidia.github.io/libnvidia-container/gpgkey | sudo gpg --dearmor -o /usr/share/keyrings/nvidia-container-toolkit-keyring.gpg \
  && curl -s -L https://nvidia.github.io/libnvidia-container/stable/deb/nvidia-container-toolkit.list | \
    sed 's#deb https://#deb [signed-by=/usr/share/keyrings/nvidia-container-toolkit-keyring.gpg] https://#g' | \
    sudo tee /etc/apt/sources.list.d/nvidia-container-toolkit.list
sudo apt-get update
export NVIDIA_CONTAINER_TOOLKIT_VERSION=1.18.2-1
  sudo apt-get install -y \
      nvidia-container-toolkit=${NVIDIA_CONTAINER_TOOLKIT_VERSION} \
      nvidia-container-toolkit-base=${NVIDIA_CONTAINER_TOOLKIT_VERSION} \
      libnvidia-container-tools=${NVIDIA_CONTAINER_TOOLKIT_VERSION} \
      libnvidia-container1=${NVIDIA_CONTAINER_TOOLKIT_VERSION}
Installing Isaac Sim
Run the following commands in terminal to install Isaac Sim:
# Go to the home directory
cd ~

# Create a new directory to store the Isaac Sim installation
mkdir -p isaacsim
cd isaacsim

# Download the zip file containing the Isaac Sim installation
wget https://download.isaacsim.omniverse.nvidia.com/isaac-sim-standalone-5.1.0-linux-x86_64.zip

# Unzip the file
unzip isaac-sim-standalone-5.1.0-linux-x86_64.zip

# Run the post-installation scripts, no need to select any options besides default
./post_install.sh
./isaac-sim.selector.sh

# Delete the zip file
rm isaac-sim-standalone-5.1.0-linux-x86_64.zip
Done :+1:
Setting environment variables
Add the following to your ~/.bashrc file.
# ---------------------------
# ISAAC SIM SETUP
# ---------------------------
# Isaac Sim root directory
export ISAACSIM_PATH="${HOME}/isaacsim"
# Isaac Sim python executable
export ISAACSIM_PYTHON="${ISAACSIM_PATH}/python.sh"
# Isaac Sim app
export ISAACSIM="${ISAACSIM_PATH}/isaac-sim.sh"

# Define an auxiliary function to launch Isaac Sim or run scripts with Isaac Sim's python
# This is done to avoid conflicts between ROS 2 and Isaac Sim's Python environment
isaac_run() {

    # ------------------
    # === VALIDATION ===
    # ------------------
    if [ ! -x "$ISAACSIM_PYTHON" ]; then
        echo "❌ IsaacSim python.sh not found at: $ISAACSIM_PYTHON"
        return 1
    fi
    if [ ! -x "$ISAACSIM" ]; then
        echo "❌ IsaacSim launcher not found at: $ISAACSIM"
        return 1
    fi

    # -------------------------
    # === CLEAN ENVIRONMENT ===
    # -------------------------
    # Unset ROS 2 environment variables to avoid conflicts with Isaac's Python 3.11
    unset ROS_VERSION ROS_PYTHON_VERSION ROS_DISTRO AMENT_PREFIX_PATH COLCON_PREFIX_PATH PYTHONPATH CMAKE_PREFIX_PATH

    # Remove ROS 2 paths from LD_LIBRARY_PATH if present
    local ros_paths=("/opt/ros/humble" "/opt/ros/jazzy" "/opt/ros/iron")
    for ros_path in "${ros_paths[@]}"; do
        export LD_LIBRARY_PATH=$(echo "$LD_LIBRARY_PATH" | tr ':' '\n' | grep -v "^${ros_path}" | paste -sd':' -)
    done

    # -----------------------------
    # === UBUNTU VERSION CHECK ===
    # -----------------------------

    if [ -f /etc/os-release ]; then
        UBUNTU_VERSION=$(grep "^VERSION_ID=" /etc/os-release | cut -d'"' -f2)
    fi

    # If Ubuntu 24.04 -> use the Isaac Sim internal ROS2 Jazzy (ROS2 Jazzy bridge)
    if [[ "$UBUNTU_VERSION" == "24.04" ]]; then
        export ROS_DISTRO=jazzy
        export RMW_IMPLEMENTATION=rmw_fastrtps_cpp
        export LD_LIBRARY_PATH="${LD_LIBRARY_PATH}:${ISAACSIM_PATH}/exts/isaacsim.ros2.bridge/jazzy/lib"
        echo "🧩 Detected Ubuntu 24.04 -> Using ROS_DISTRO=jazzy"
    # If Ubuntu 22.04 -> use the Isaac Sim internal ROS2 Humble (ROS2 Humble bridge)
    else
        export ROS_DISTRO=humble
        export RMW_IMPLEMENTATION=rmw_fastrtps_cpp
        export LD_LIBRARY_PATH="${LD_LIBRARY_PATH}:${ISAACSIM_PATH}/exts/isaacsim.ros2.bridge/humble/lib"
        echo "🧩 Detected Ubuntu ${UBUNTU_VERSION:-unknown} -> Using ROS_DISTRO=humble"
    fi

    # ---------------------
    # === RUN ISAAC SIM ===
    # ---------------------
    if [ $# -eq 0 ]; then
        # No args → Launch full Isaac Sim GUI
        echo "🧠 Launching Isaac Sim GUI..."
        "${ISAACSIM}"

    elif [[ "$1" == --* ]]; then
        # Arguments start with "--" → pass them to Isaac Sim executable
        echo "⚙️  Launching Isaac Sim with options: $*"
        "${ISAACSIM}" "$@"

    elif [ -f "$1" ]; then
        # First argument is a Python file → run with Isaac Sim's Python
        local SCRIPT_PATH="$1"
        shift
        echo "🚀 Running Python script with Isaac Sim: $SCRIPT_PATH"
        "${ISAACSIM_PYTHON}" "$SCRIPT_PATH" "$@"

    else
        # Unrecognized input
        echo "❌ Unknown argument or file not found: '$1'"
        echo "Usage:"
        echo "  isaac_run                 → launch GUI"
        echo "  isaac_run my_script.py    → run script with IsaacSim Python"
        echo "  isaac_run --headless ...  → launch IsaacSim with CLI flags"
        return 1
    fi
}
Test the current environment by running isaac_run in terminal. This should open a new window running Isaac Sim.
Test that the Isaac Sim python interpreter path variable is correct by running in the terminal:</br> $ISAACSIM_PYTHON ${ISAACSIM_PATH}/standalone_examples/api/isaacsim.core.api/add_cubes.py</br>
Installing Pegasus Simulator extension
- Launch Isaac Sim with
isaac_runin terminal. - Open the Window->extensions on the top menubar inside Isaac Sim.
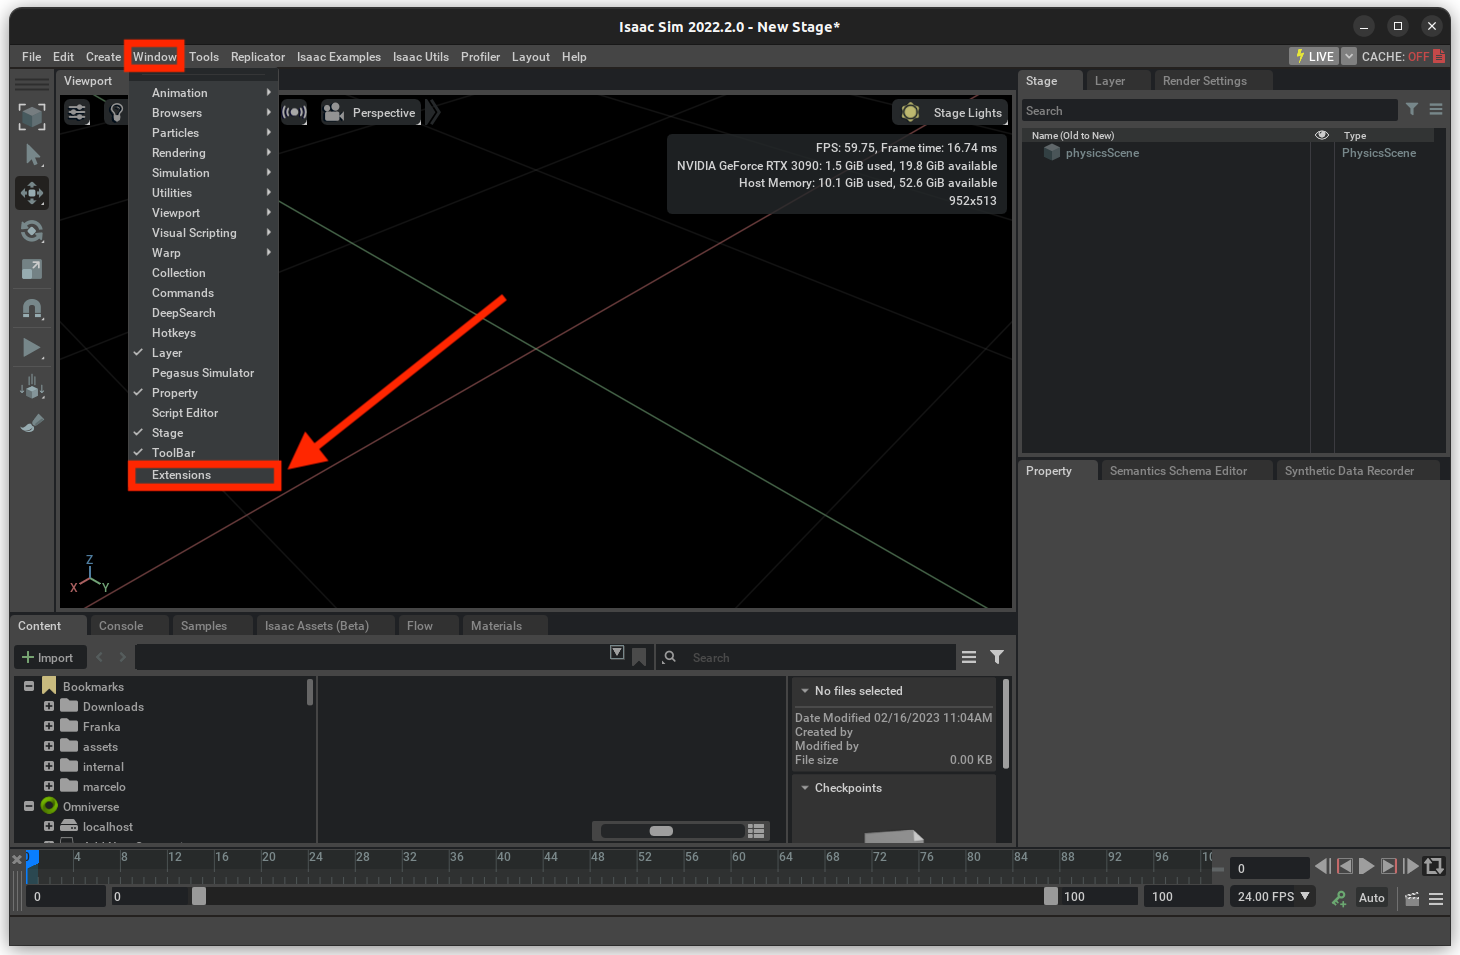
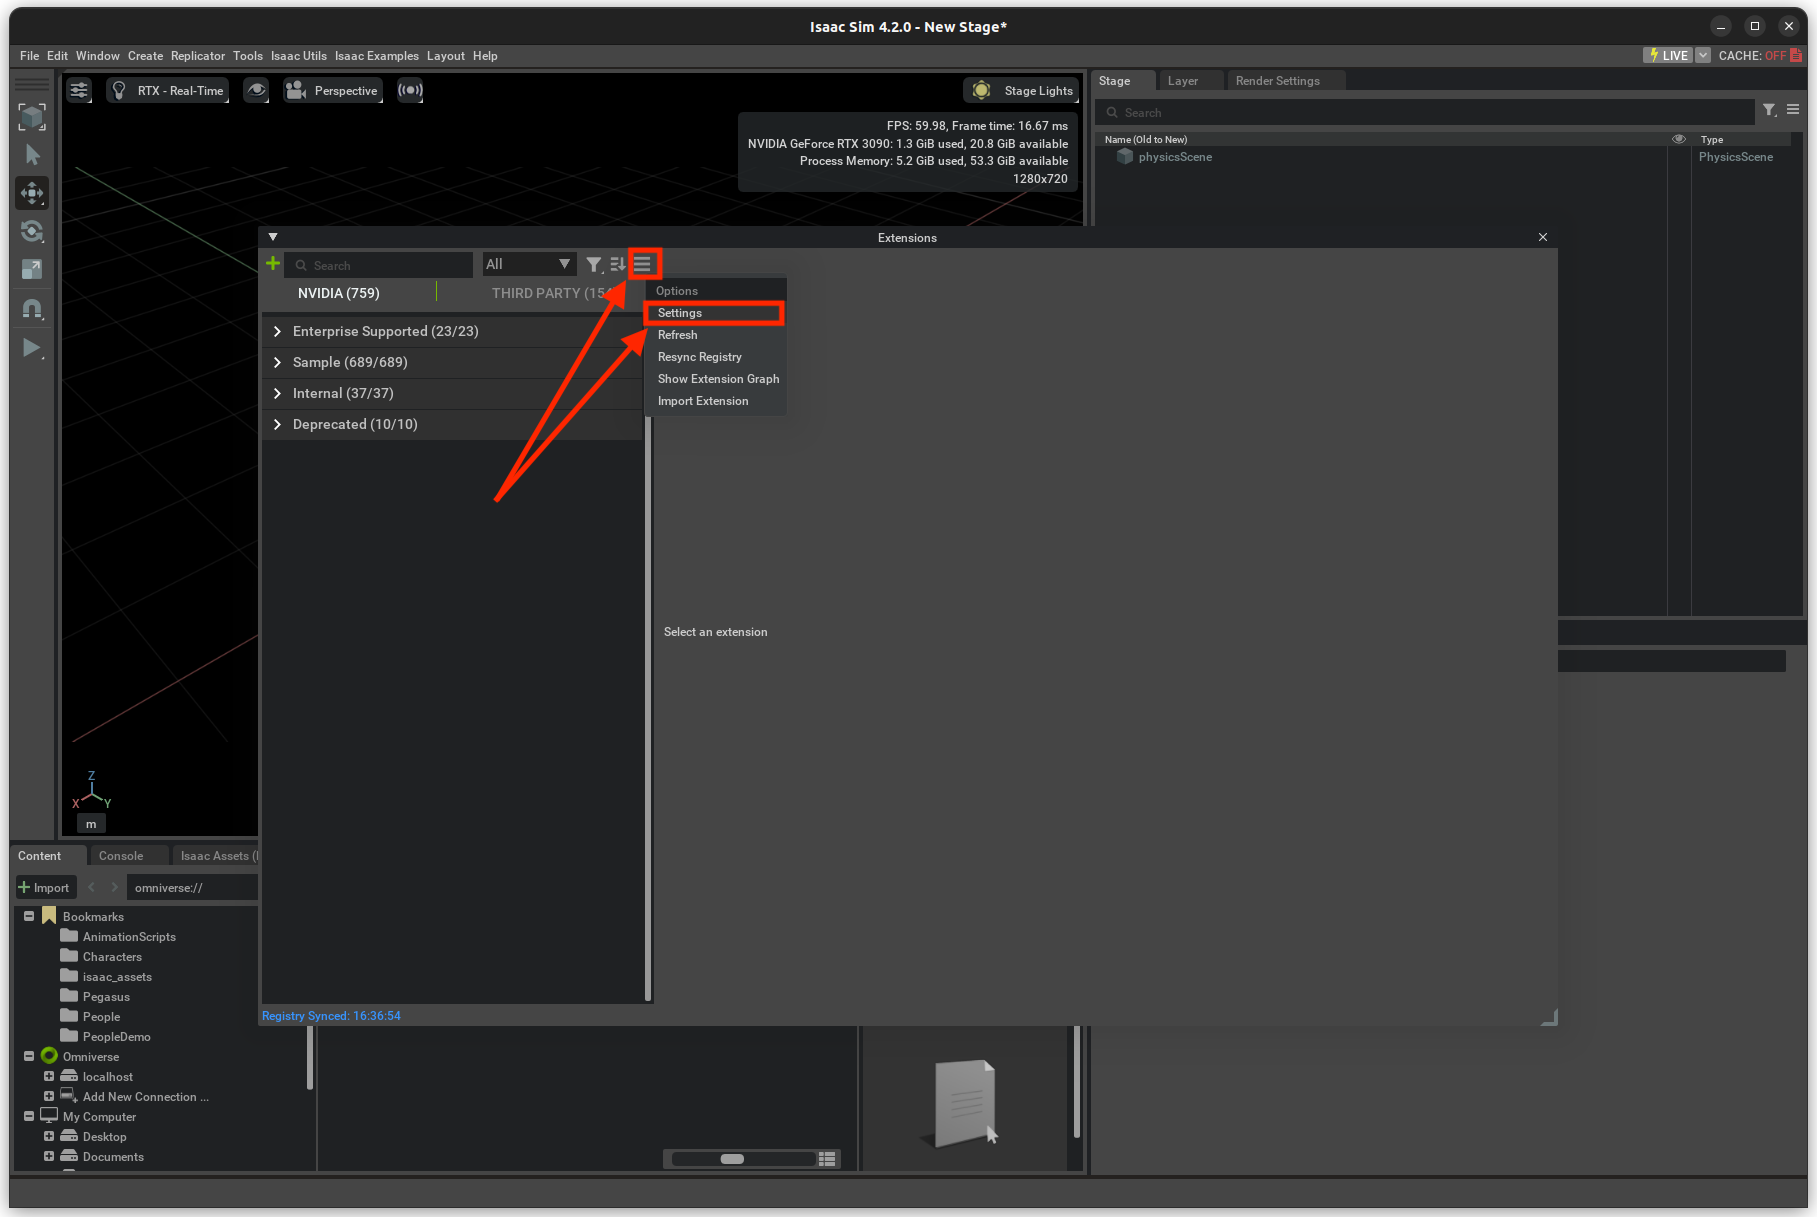
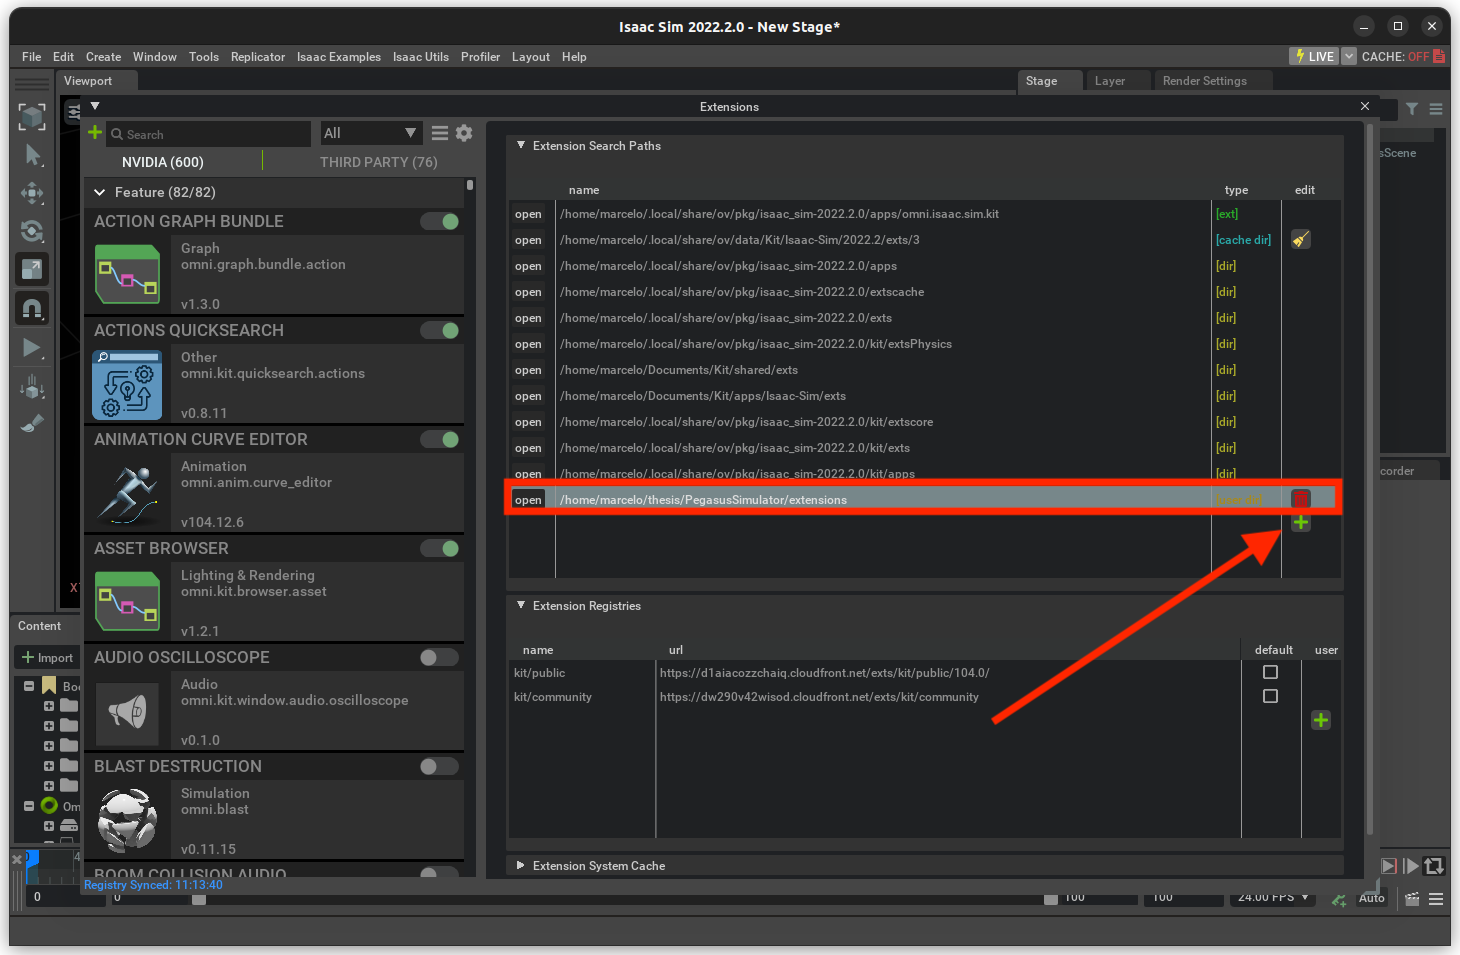
- On the Extensions manager menu, we can enable or disable extensions. By pressing the settings button, we can add a path to the Pegasus-Simulator repository.
- The path inserted should be the path to the repository followed by /extensions.
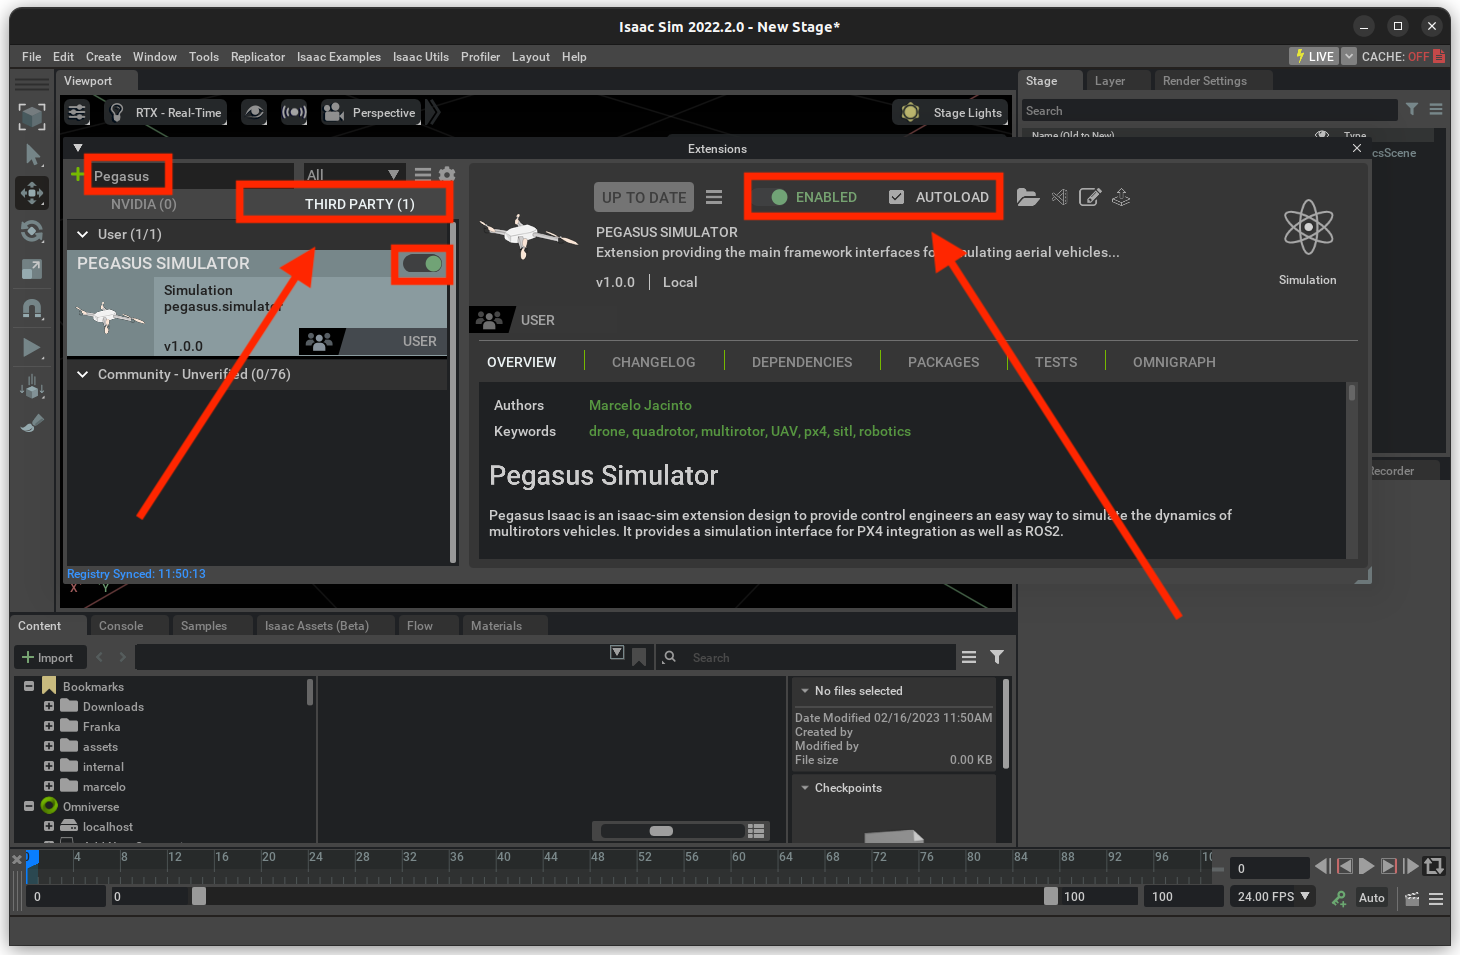
- After adding the path to the extension, we can enable the Pegasus Simulator extension on the third-party tab. Enable AUTOLOAD.
Installing the extension as a library
In order to be able to use the Pegasus Simulator API from python scripts and standalone apps, we must install this extension as a pip python module for the built-in ISAACSIM_PYTHON to recognize. For that, run:
# Go to the repository of the pegasus simulator
cd PegasusSimulator

# Go into the extensions directory
cd extensions

# Run the pip command using the built-in python interpreter
$ISAACSIM_PYTHON -m pip install --editable pegasus.simulator
Setting PX4 Path
Running a simulation with Isaac Sim and Pegasus Simulator requires the path for PX4-Autopilot to be set in Pegasus Simulator configurations.
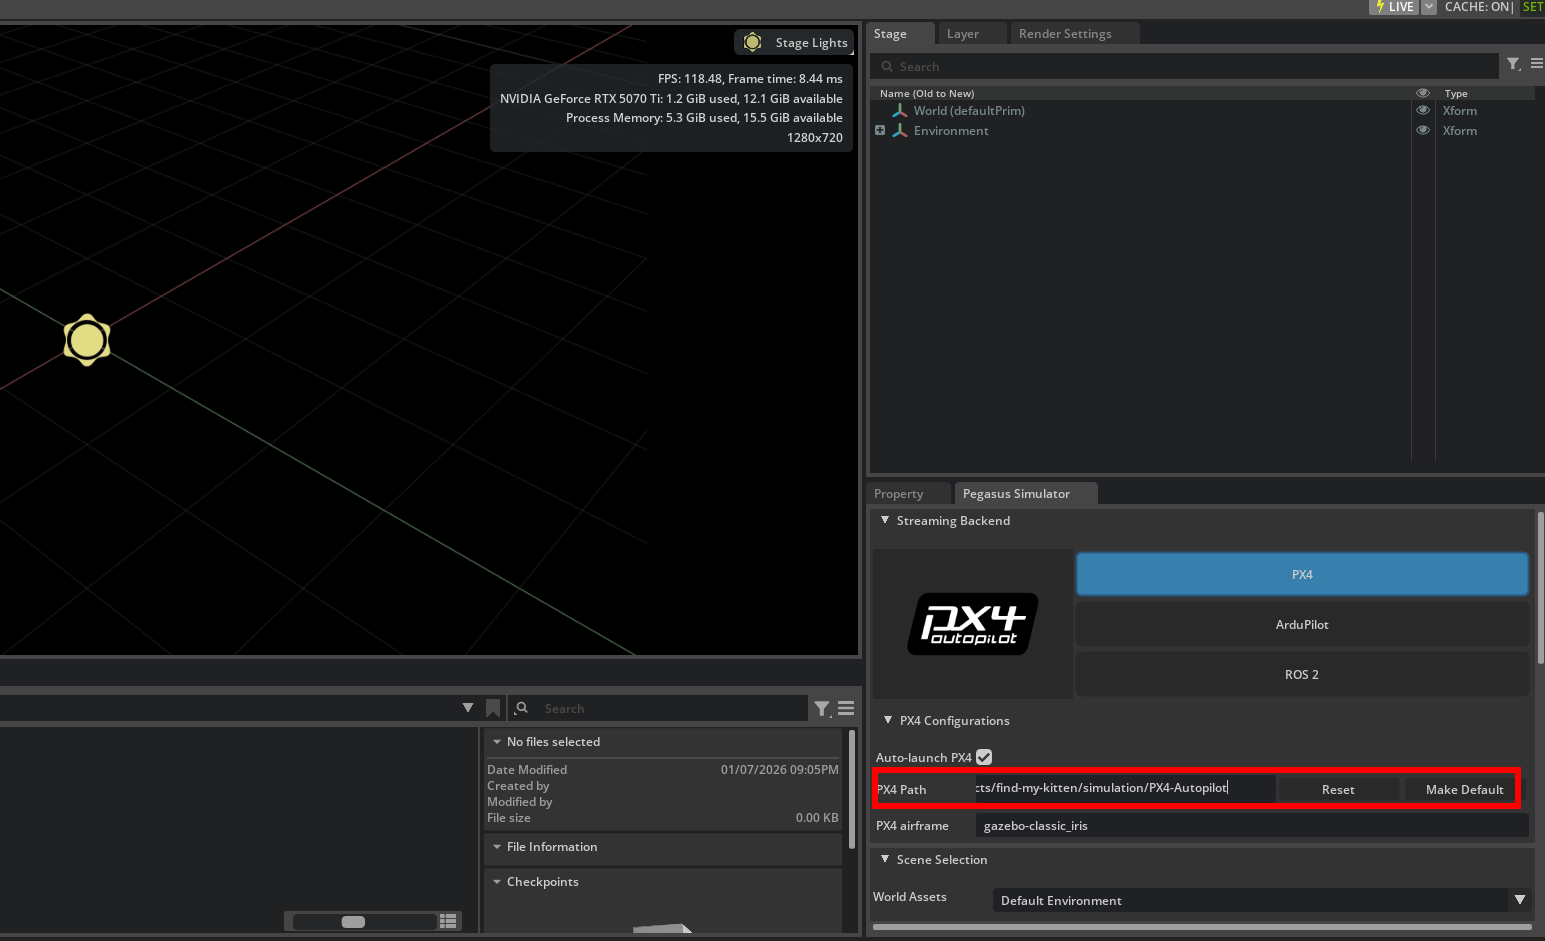
The input field can be found in the bottom right of Isaac Sim in the Pegasus Simulator tab, under PX4 Configurations.
Set the value to the path of your PX4-Autopilot directory, for our purposes we can use the directory in this repository’s simulation directory:
find-my-kitten/simulation/PX4-Autopilot
Press Make Default next to the path input field.
Setup toolchain
First, let’s set up the toolchain:
- Install the PX4 toolchain as per PX4 Toolchain Guide. If QGroundControl is not working for you, here guidance on how to proceed with the steps requiring QGroundControl. If there are any problems when installing PX4-Autopilot, refer to the Common problems -section.
- Install ROS2 and Micro-XRCE as per PX4 ROS2 Guide.
- Use our custom simulation markdown / custom simulation website documentation setup.
- Clone our find-my-kitten repository: ` git clone https://github.com/CatScanners/find-my-kitten `
- Make any changes to any of the packages inside ros2_ws-folder, or create new ones. Please refer to ROS2 documentation. Shortly: change the code,
colcon build, andsource install/setup.bash.
Simulation startup
- Open up a QGroundControl window.
- Run the XRCE-agent:
MicroXRCEAgent udp4 -p 8888. - Start the simulation:
- To start the simulation:
make px4_sitl gz_x500_baylands - To start the simulation camera bridge:
ros2 run ros_gz_image image_bridge /camera.
- To start the simulation:
- From QGroundControl, arm and takeoff. If you don’t have QGC, please refer to the Common problems -section.
Building and Running the simulator inside docker container
Setup
Before running the simulation inside a container, you’ll first have to start the container and build ros2 by following the following steps:
./start_isaac_dev.sh -sc
NOTE: If after the last command you get an error and the message: “have you initialized submodules?”, circle back to the git-lfs section of Initial setup
If the script runs without errors, then you will notice that it starts the docker container. This step will take around 30 minutes, so you’ll have to wait a while.
After you have successfully started the container, cd into /ros2_ws in the container, and build the package by running:
colcon build
After building, return to the parent directory and run the following list of commands (You can copy paste all of them at once into the terminal and press enter):
cd /home/admin/isaacsim/
./post_install.sh
./isaac-sim.selector.sh
source ~/.bashrc
cd /workspaces/isaac_ros-dev
sudo apt update
sudo apt install libcanberra-gtk-module libcanberra-gtk3-module
uv sync
uv add smmap gitpython numpy scipy
source .venv/bin/activate
sudo chown -R admin:admin /home/admin/PegasusSimulator
export ISAACSIM_PYTHON=/home/admin/isaacsim/python.sh
export ISAACSIM_PATH=/home/admin/isaacsim
$ISAACSIM_PYTHON -m pip install --editable /home/admin/PegasusSimulator/extensions/pegasus.simulator
cd ros2_ws
source install/setup.bash
source /opt/ros/humble/setup.bash
When runnin these commands, you should get a small GUI pop-up that is the setup for the simulator UI.
In this window, Just press the large green button at the bottom, wait for a larger UI to open, and then you can close both GUI’s and go to the next step.
Building and Running the simulator inside docker container
** You can also run the simulator outside of the docker container by omitting the initial ./start_isaac_dev.sh -sc command, but You have to make sure that your directory names are the same OR you change the code accordingly**
If you want to run the simulator outside of the docker container, run the following command series instead of the ones given before:
cd /home/admin/isaacsim/
./post_install.sh
./isaac-sim.selector.sh
source ~/.bashrc
cd /workspaces/isaac_ros-dev
sudo apt update
sudo apt install libcanberra-gtk-module libcanberra-gtk3-module
uv sync
uv add smmap gitpython numpy scipy
source .venv/bin/activate
sudo chown -R admin:admin /home/admin/PegasusSimulator
export ISAACSIM_PYTHON=/home/admin/isaacsim/python.sh
export ISAACSIM_PATH=/home/admin/isaacsim
$ISAACSIM_PYTHON -m pip install --editable /home/admin/PegasusSimulator/extensions/pegasus.simulator
cd ros2_ws
source install/setup.bash
source /opt/ros/humble/setup.bash
Running the simulator
After the last series of commands, you should be at the path: /workspaces/isaac_ros-dev/ros2_ws
In this folder, you can start the simulation by running the following command:
ros2 launch kitten_sim kitten_sim.launch.py
On how to start up ROS2 nodes, refer to the vision package and visual navigation sections in the Development section of the docs.
—- Real life quick start (Jetson baseboard + PX6 + drone) —-
This part guides the user on how to setup the actual drone and how to connect a Holybro Pixhawk Jetson Baseboard into it, the installation of all the relevant software. If you already have our pre-built drone with the baseboard, feel free to skip until the “Running the software part”. This part also includes information about necessary permissions and who is actually allowed to fly the drone in Finland.
Requirements
- Knowledge of Linux.
- Holybro Pixhawk Jetson Baseboard
- Drone frame
- Something else?
Setting up the Holybro Pixhawk Jetson Baseboard
To set up the baseboard, please follow this guide of ours. It has a link to the official guide on setting up the baseboard, and also the deviations from the official material. It also includes steps for initializing a Jetson Orin Nano Devkit, which might be helpful.
Setting up the drone
Assembly follows the HolyBro X500v2 guide with Jetson and Pixhawk setup as mentioned above.
Fly in real life
- Build the drone, refer to the Setting up the drone.
- Set up the Holybro Pixhawk Jetson Baseboard that is on the drone with our guide
- Do all the real-life overhead related to flying a drone:
- Refer to this comprehensive guide.
- Arm, takeoff and fly with position/altitude mode in QGroundControl with your controller. Then, switch to offboard mode and run the same scripts as with machine vision and actions startup.